Code to make more machines.
Note : This is very out of date
Code to make more machines.
Note : This is very out of date

But really, its all about the code.
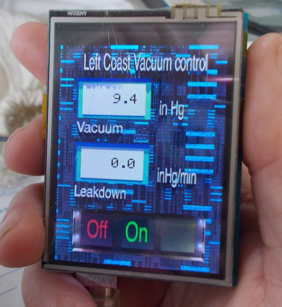
Touchscreen vacuum system controller
#include <Adafruit_GFX.h>
#include <gfxfont.h>
#include <Adafruit_ILI9341.h>
//#include <blinker.h>
#include <colorObj.h>
#include <idlers.h>
#include <lists.h>
#include <mapper.h>
#include <multiMap.h>
//#include <PulseOut.h>
#include <runningAvg.h>
//#include <servo.h>
#include <timeObj.h>
//#include <adafruit_1431_Obj.h> // ADAFRUIT_1431
#include <adafruit_1947_Obj.h> // ADAFRUIT_1947
#include <displayObj.h>
#include <drawObj.h>
#include <label.h>
#include <lineObj.h>
#include <screen.h>
label hello("Hello world!");
void setup() {
if (!initScreen(ADAFRUIT_1947)) {
while(true); // Kill the process.
}
screen->fillScreen(&green);
viewList.addObj(&hello);
}
void loop() {
idle();
}
Over on the left is the example “Hello world” using the Left Coast Visual Arduino framework.
1): Select the screen hardware you have installed . In this example its the Adafruit #1947 Capacitive touch shield.
2): Create your global drawing objects.
3): Add them to the viewList by address.
4): Make sure idle() is called in your loop.
The Left Coast drawing objets are meant to be subclassed into more useful objects by the user. For an example of this, see the The calculator project .
The idea behind the Visual Arduino project is to give the user a touchscreen computing device that’s as easy to program as an Arduino.
The Vacuum controller project was the beginning of the codebase that would evolve into the Visual Arduino. The Calculator project developed a much more powerful and useful hardware package. The combination of the two spawned the Visual Arduino project.
